|
|
HISTORICAL MINIATURES BY GEORGE GRASSE |
|
|
|
HISTORICAL MINIATURES BY GEORGE GRASSE |
|
|
SEVERSKY P-35, 94th Pursuit Squadron, 1st Pursuit Group c. 1937 |
by George Grasse

ACADEMY 1:48 SCALE PLASTIC INJECTION MOLDED KIT OF THE SEVERSKY P-35
|
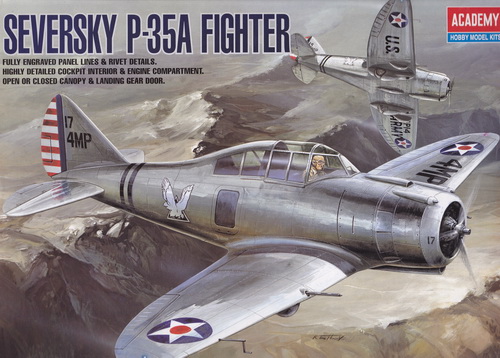
SEVERSKY P-35 BOX ART
|
 |
| This image of the kit's "box art" shows the later P-35A version. I am going to build the first version, P-35, basically the same except the right side of the fuselage has an aluminum panel in place of the Plexiglas window shown above. Also, the wing guns will not be installed. |
|
SEVERSKY P-35
THREE-VIEW
|
.jpg) |
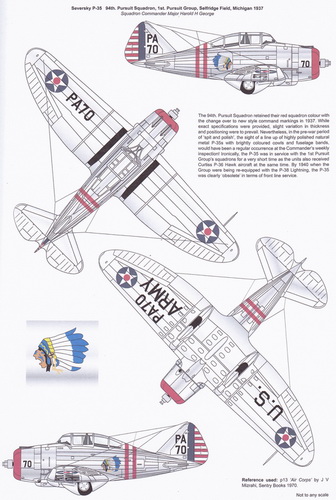
| This image is taken from Squadron/Signal's Mini in Action booklet Number 1 of the P-35 series, page 12. |
|
MODEL TO BE BUILT
|
 |
| This image is taken from Wings of Stars - US Army Air Corps 1919-1941, On Target Special, page 59, |
|
UNDER CONSTRUCTION PHOTO #1
14 February 2015
|
%20Seversky%20P-35%2001.jpg) |
| INSTALLATION OF PE UPGRADE COMPONENTS: The Eduard PE upgrade sheet goes far in detailing the model, especially the cockpit. This image shows about half of the PE details installed. |
|
UNDER CONSTRUCTION PHOTO #2
20 February 2015
|
|
%20Seversky%20P-35%2002a.jpg) |
%20Seversky%20P-35%2002b.jpg) |
| COCKPIT INTERIOR COMPLETED: All of the details have been installed. The fuselage interior is bare aluminum. After spraying, the individual components were painted in semi-gloss black. | |
|
UNDER CONSTRUCTION PHOTO #3
4 March 2015
|
%20Seversky%20P-35%2003.jpg) |
| FUSELAGE CONSTRUCTION: The fuselage halves have been glued together and allowed to dry for one day. Most of the joints required just a little sanding and a few areas needed putty and then sanding. Meanwhile, the wing was built up by first gluing the the two upper outer panels to the one-piece wing under-section. The landing gear struts and few other wing details were added and the wing was joined to the fuselage. The fit was quite good and needed very little in the way of putty for fill. While the fuselage/wing section dried, the engine was built. It consists of two 9-cylinder rows glued back-to-back. From the PE sheet was glued the spark plug wiring. This took a while since the super glue was slow to dry and only two sets of spark plug wires could be worked on at one time. |
|
UNDER CONSTRUCTION PHOTO #4
5 March 2015
|
%20Seversky%20P-35%2004.jpg) |
| ENGINE PREP: The engine is painted overall with a mix of Vallejo VC0995 German Dark Gray and VC0864 Natural Steel. Details will be highlighted with VC0997 Silver. Note that the tail wheel and the PE tail wheel doors are installed. |
|
UNDER CONSTRUCTION PHOTO #3
4 March 2015
|
%20Seversky%20P-35%2003.jpg) |
| FUSELAGE CONSTRUCTION: The fuselage halves have been glued together and allowed to dry for one day. Most of the joints required just a little sanding and a few areas needed putty and then sanding. Meanwhile, the wing was built up by first gluing the the two upper outer panels to the one-piece wing under-section. The landing gear struts and few other wing details were added and the wing was joined to the fuselage. The fit was quite good and needed very little in the way of putty for fill. While the fuselage/wing section dried, the engine was built. It consists of two 9-cylinder rows glued back-to-back. From the PE sheet was glued the spark plug wiring. This took a while since the super glue was slow to dry and only two sets of spark plug wires could be worked on at one time. |
|
UNDER CONSTRUCTION PHOTO #4
5 March 2015
|
%20Seversky%20P-35%2004.jpg) |
| ENGINE PREP: The engine is painted overall with a mix of Vallejo VC0995 German Dark Gray and VC0864 Natural Steel. Details will be highlighted with VC0997 Silver. Note that the tail wheel and the PE tail wheel doors are installed. |
|
UNDER CONSTRUCTION PHOTO #5
14 March 2015
|
%20Seversky%20P-35%2005.jpg) |
| PAINTING AND DECALS: The model was oversprayed, top and bottom, with Tamiya TM85083 Metallic Silver. Decals as shown were applied next and then over-sprayed with semi-gloss polyurethane. The back of the propellers was painted with Vallejo VC0814 Burnt Cadmium Red. |
|
UNDER CONSTRUCTION PHOTO #6
14 March 2015
|
%20Seversky%20P-35%2006.jpg) |
| PAINTING AND DECALS - ANOTHER VIEW - The propeller logo decals were taken from the kit's decal sheet. All other decals are from Yellow Wings sheet YW 48-051. |
|
UNDER CONSTRUCTION PHOTO #7
7 May 2015
|
%20Seversky%20P-35%2007.jpg) |
| FINAL PAINTING, DECALS, AND TOUCH-UP - The red cowling color is Vallejo VC0909 Vermillion, two thin coats brushed on. All of the remaining decals from the Yellow Wings sheet YW 48-051 were now applied. After a 24-hour drying period for the decals, the model was oversprayed (canopy taped off) with a thin coat of semi-gloss polyurethane to seal the decals. |
|
UNDER CONSTRUCTION PHOTO #8
7 May 2015
|
%20Seversky%20P-35%2008.jpg) |
| FINAL PAINTING, DECALS, AND TOUCH-UP - The only item added at the very end is kit's Pitot tube on the forward edge of the right wing, and, voila - she is done! |
COMPLETED MODEL PHOTO GALLERY
%20Seversky%20P-35%2009.jpg)
%20Seversky%20P-35%2010.jpg)
%20Seversky%20P-35%2011.jpg)
%20Seversky%20P-35%2012.jpg)
REFERENCES:
Bell, Dana. Air Force Colors Volume 1 1926-1942. Carrollton, Texas: Squadron Signal Publications, 1995.
Freeman, Peter and Mike Starmer. Wings of Stars - US Army Air Corps 1919-1941, On Target Special. Ardington, North Wantage, Oxfordshire, UK: The Aviation Workshop Publications, 2009.
GO TO?