|
ISSUE NUMBER 5 |
HISTORICAL MINIATURES BY GEORGE GRASSE |
AUGUST 2009 |
HISTORICAL MINIATURES JOURNAL ISSUE NUMBER 5
PUBLISHED BY GEORGE GRASSE
MODELING TIPS
MILITARY MINIATURES

WORLD WAR I AVIATION MODELING IN 1:48 SCALE
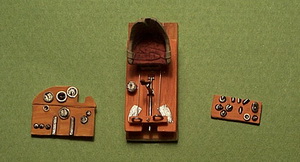
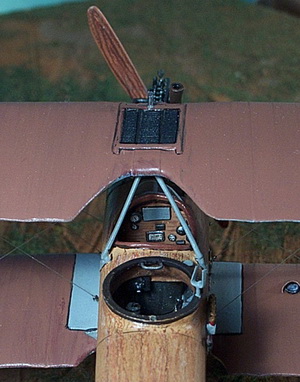
Tip 20) Cockpit detailing is either a burden or a challenge. For me, I accept it as a challenge. I do the research and find as many cockpit photos and illustrations as there are available to me. I check reviews and kit builds when I find them in a modeling magazine or on "the net". Much of what I install is based on fact and I try and scratch-build the components as realistically as possible. In many cases, I add components and wires just to "clutter up" the cockpits. Of course, if you are going to add a crew figure, take the time to see whether or not the cockpit component will be seen. The photo on the left below are, left to right, instrument panel for an AEG C.IV, the cockpit floor with seat, rudder bar, controls, and scratch-built floor compass for a Fokker D.VII, and the instrument panel for a Fokker D.VII. The photo on the right looks into the pilot's instrument panel on an Albatros C.X; note the scratch-built compass mounted in the lower right wing with a semi-circular airstream hood.


Tip 21) Engine detailing can also be a burden or a challenge. Again, I prefer the challenge and add as many engine details as can be seen once it is installed. You can make valve springs, spark plug wires, pipes, and pumps from scratch but be sure they are visible because your time is valuable. Study photos over and over again. Black and white photos are good for finding details. Field modifications did occur especially to coolant pipes. Note that there were several manufacturers of engine components especially exhaust pipes. Color photos of engines in museums and private collections are necessary for painting. Try to paint the engine's components in slightly different shades even if the painting guide says "black". For example, the engine crank case is usually aluminum and, for the most part out of sight. The cylinders can be a slightly metallic black color. The valve covers can be a slight variation of the metallic black highlighted with steel dry-brushing. Wires can be dark gray just to make them stand out. Usually, two to three items for the engine have to be scratch-built because the kit's version is wrong or not good enough to use. In many cases, the kit engine does not have the details in the first place. For example, note the front end of a Mercedes D.III engine and all of the small components and pipes usually not found in a kit.
---------------------------------------------------------------------------------------------------------------------------------
GO TO?