 |
|
ISSUE NUMBER 11 |
HISTORICAL MINIATURES BY GEORGE GRASSE |
FEBRUARY 2011 |
HISTORICAL MINIATURES JOURNAL ISSUE NUMBER 11
PUBLISHED BY GEORGE GRASSE
MODELING TIPS
MILITARY MINIATURES
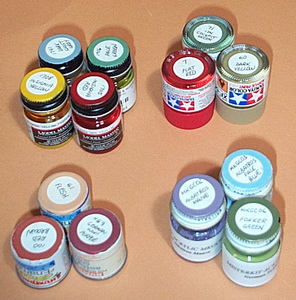
Tip 31) Storing Paint: most modelers begin to accumulate paint in all sizes and types from a variety of manufacturers. None are to be wasted because you just might need that one special color again. As often happens, older paints dry up and die. I learned a long time ago that glass jars and tins are preferred to plastic containers for their longevity in protecting paint. Most of the newer acrylics in the familiar Andrea/Vallejo style containers are pretty good. In fact, I have quite a few bottles dating back to the 1990s and they're still good. If you can turn the bottle or tin upside down, you absolutely prevent oxidation and the drying out of paints. All my Humbrol tins, Model Master glass jars, and Tamiya paints are stored upside down. In the case of the glass Model Master and Tamiya brands, you can see the color (though somewhat diffused) through the bottom of the jar. The tins have to be painted and then labeled using a small Avery circular stickers.
In the photo below, you can see several types of typical modeling paints and how I store them. Upper left-hand corner are four Model Master enamel paints in glass jars with metal tops. These are fine for storage. Note that I have painted the caps with the paint color and have placed a label so they can be read from the top. The right-hand corner shows three Tamiya acrylic glass jars with plastic lids. The plastic lids are problematic, so I store them upside-down. Again, I add labels so I can read the paint color from the top. In the lower left are three tins of Humbrol enamel paints. Initially, the paints store quite well. However, after extending use, paint builds up on the rim and dries out. This makes for a less than effective seal when stored up-right. Here again I store these upside-down to lock out air. The tops are painted with the color in the tin. Then, a label is added. The group on the bottom right are Misterkit paints that have been transferred from their thin-walled plastic bottle with plastic caps to Testor's 1/2 oz glass jars. The combination of glass and metal lids makes for excellent storage so these are stored upright with their painted lids and labels showing.
 |
WORLD WAR I AVIATION MODELING IN 1:48 SCALE
Tip 32) Making hex sheets for painting odd-sized printed camouflage fabric decals not available on the market. I'm using a Kriegsmarine hex pattern in the example below and a fair amount of these are already available from Lone Star Models and Copper State Models. I'll be working on a future project for an AEG bomber that using their unique factory hex pattern which I have never seen in the market. More on that in the next issue.
| 1 | Find a pattern of uniform hexes preferably on a sheet of white paper. The hexes should be thin and in a light to medium gray color. In my olden days, I was an avid military board gamer and occasionally designed my own games, usually American Civil War. I bought a number of 36" by 48" hex sheets on which are printed 1/2" hexes. |
| 2 | Scan a portion of the sheet into your computer as a JPEG picture. Figure out the scale you want to reproduce, say 1:72, 1:48, or 1:32. Experiment with the reduction of the master and make a test print. Does the test print match the hex pattern for your scale? If not, make adjustments of the JPEG picture either larger or smaller. Test print again. When you have reproduced the scale of hexes you're ready to make a decal. |
| 3 | Before you print a decal sheet, you may want to reproduce the test sheet and internally expand the size of your sheet, say from 12 hexes across to 42 hexes across. The same applies with added hexes downward. In the end, you want a hex sheet that will print and fill up an 8-1/2" x 11" sheet. You can also tone down the gray hex lines to a softer one so they don't stand out as though they were bordered in black. Remember, the hexes are a painting guide. |
| 4 | Using Clear/Clear decal paper, print one sheet preferably off a laser jet. If you were going to camouflage a Kriegsmarine aircraft, you have to reproduce from your paint bottle collection three colors one which you will use to paint the aircraft on all parts where the three-color camouflage is to appear. |
| 5 | Using one of the three colors, paint all surfaces where the camouflage is to appear in this color, call it color number 1. When completely dry, overspray with a coat of either gloss or semi-gloss polyurethane so the decal will stick. When dry, start cutting hex decal pieces and apply to the aircraft. |
|
6
|
Skipping ahead, let's say you've got the aircraft covered in what now appears to be one of the three-color camouflage colors with ready to paint "open" hexes; that is, hexes that are to be covered in one of the two remaining paints according to a uniform pattern. You will have to know the hex color repeat pattern and apply one color at a time according to that pattern. |
|
7
|
Start painting the hexes identified for color number 2. When these are done, you can now apply color number 3. Perform due diligence and review your three-color camouflage pattern to be sure you didn't miss a spot. All you need to do now is over spray with polyurethane to protect the surface. |
---------------------------------------------------------------------------------------------------------------------------------
GO TO?