HISTORICAL MINIATURES JOURNAL ISSUE NUMBER 13
PUBLISHED
BY GEORGE GRASSE
MODELING
TIPS
WOOD AND FLAT KIT BASE GROUND WORK
Tip 36: There two types of bases
for displaying individual or group figures. The less expensive method is
to use the base that comes in the kit with the figure. I paint for several
collectors and about one out of five prefer the kit's flat base. The
slightly more expensive display media is the wood base. It adds a little
more formality to the display of the figure but one has to purchase the wood
base separately.
To finish the display either for the
flat or wood base, the procedure is the same. My method has been
standardized for well over thirty years. The basic components of the
scenery, as I call it, are static grass, pieces of tree limbs, rocks, sand of
different colors, and commercial accessories such as cast walls, sides of
buildings, equipment including a lamp post, barrel, strewn ammunition boxes. . .
. . the list goes on depending on the situation you wish to create. The
bare bones method is to take the base supplied in the kit, cut it up to fit your
wood base (maybe you don't need to do that), sand off the top of the base and
the bottom of the flat base so a good super glue bond bill take hold. If
you don't work with the flat base and wish to add a scenery item such as a small
grouping of rocks, use super glue to hold the rocks in place on the base.
You don't have to wait for the glue to set up except in the first minute or two.
That's a good time to sprinkle dirt onto the exposed wet super glue because that
gets you ground work going.
There are three ways to attach material and accessories to
the base: 1) the super glue method just described which is my favorite because
it's quick; 2) the white glue method which is great for application of dirt and
static grass and it doesn't take too long to dry; and 3) the epoxy method,
preferably the 5-minute two-part type which is stronger for heavier items and
works quickly but it's not as good for just a dirt and static grass covering.
Figure 1 below shops two typical bases, one wood and one flat kit base. As
a modeler, you are starting from scratch with the wood base. The flat kit
base usually is cast with some earth and rock material. What follows
is a simplified photo essay on the basics of groundwork.
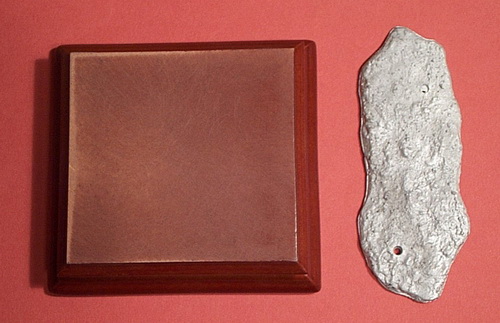
Figure 1: Wood Base versus Flat Kit Base
 |
|
Figure 1 shows a typical wood base on the left and a flat kit base
for a mounted figure on the right. The wood base is Andrea
ANPC16 measuring 45mm x 45mm. I always sand off the varnish on
the top of the base so glue and epoxy can form a better bond. |
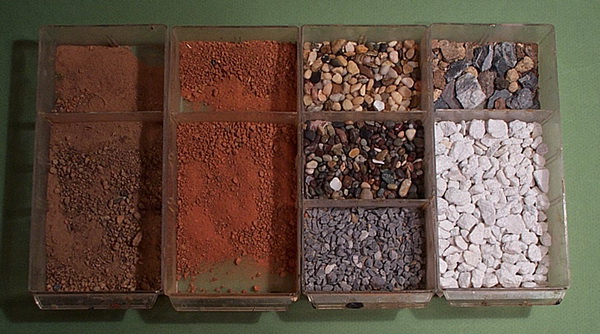
Figure 2: Basic Groundwork Materials:
Dirt and Rocks
 |
|
Figure 2 shows four plastic storage trays. The two on the left
are labeled "sand " dirt and "red" dirt. Each "dirt" tray has
a smaller compartment which contains a mix dirt but hard to discern
in this photo. The two trays on the right are labeled
"small rocks" and "medium rocks". The small gray rocks are
model railroad ballast, the two above it are aquarium rocks.
The right-hand tray contains white modeling rocks and the smaller
upper compartment has rocks gathered from the earth, mostly
limestone. I'm more interested in the shapes and edges of the
rocks because 90% of them get painted anyway. |
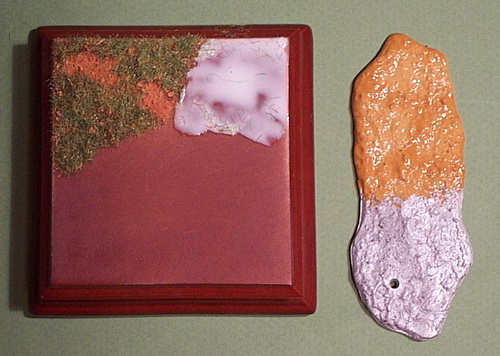
Figure 3: Preliminary Groundwork
 |
|
Figure 3 shows preliminary steps. On the wood base, white glue
is laid down by brush (right upper quadrant). Over this is
sprinkled the dirt in small irregular patches leaving some of the
white uncovered over which is sprinkled static grass (upper right
quadrant). The flat metal base on the right is already
"contoured" so it just needs to have a base coat applied. The
lower half of the base is primed. The upper half shows one
coat of an earth tone applied once the primer is dry. |
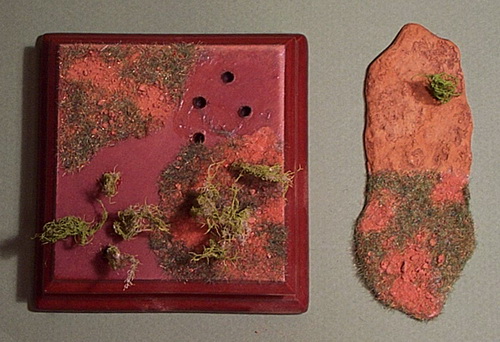
Figure 4: Stages of Groundwork
 |
|
Figure 4 shows various stages of groundwork. On the wood base
in the upper left quadrant is a simple mix of dirt and static grass.
The upper right quadrant shows holes drilled for bushes or trees.
The lower left quadrant shows pre-painted lichen which I gather from
Virginia woods. The lower right quadrant shows the dirt and
static grass added to the lichen ground work. The flat base on
the right has had its coat of paint stained with a watered down dark
brown shade and one piece of lichen has been added to it. The
lower half of the base was primed only over which was applied a mix
of dirt and static grass. |
---------------------------------------------------------------------------------------------------------------------------------
GO TO?
© Copyright by George Grasse