|
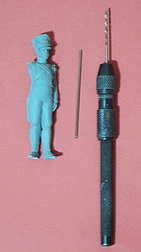
Tip 28) Quite often, manufacturer's do not include integral pins on the bottom of the legs to make fixing the figure to a base easy. I ship a lot of figures and all are pinned either with the manufacturer's cast-on white metal pins or I make my own out of brass rod stock. Usually one leg is all that has to be pinned. I have a matching drill bit for the brass rod. I drill out a hole about 1/4" deep, perhaps a little deeper. I use super glue to fix the pin to the leg. Now, when mounting to a base, the figure has a good chance of staying in place. Horses present the same problem especially if only one or two legs are on the ground. In this case, both legs will be pinned. If a third pin is needed, choose a leg nearest the ground and not touching it. Drill a hole in hoof and a corresponding hole in base. Coordinate the locating, drilling, and positioning of all three pins. When done, the horse will be securely mounted to the base. Imrie-Risley horse present a unique problem. I find a drill bit large enough to create a hole for the oversize leg bottom but only drill into the wood so as to keep the hooves at ground level. If you drill too deep, fill with fine sand and super glue until the correct height is achieved. You have to do this for all legs that have that "plug". When you decide to do this, make sure the legs are correctly positioned. Place the horse onto the base. Draw a pencil circle around the "plug". Drill out the hole carefully and not too deep. Fit the horse into position and make adjustments either filling in because it's too deep or drilling out a little more material because it's too shallow. |
|